0001 (Message Wall | contribs) |
0001 (Message Wall | contribs) No edit summary |
||
| Line 2: | Line 2: | ||
Immortal Mountain, or Mount Fuji, is the dungeon following the first visit to [[Inugami Village]] |
Immortal Mountain, or Mount Fuji, is the dungeon following the first visit to [[Inugami Village]] |
||
| − | It is one of the most complex dungeons in [[Shadow Hearts: Covenant]]. The reason for it is its bizarre setup. The player recieves three crystals. When placed on an altar, each different crystal can activate a teleport system that takes the player to different areas. Using these in different sequences allows the best access |
+ | It is one of the most complex dungeons in [[Shadow Hearts: Covenant]]. The reason for it is its bizarre setup. The player recieves three crystals. When placed on an altar, each different crystal can activate a teleport system that takes the player to different areas. Using these in different sequences allows the best access. |
| + | The treasure is the main reason for all this exploration, as some [[Crest Magic|Crests]] can be found here. One path sequence leads directly to the Ring Soul, who gives Yuri and Karin an Attack Boost. |
||
| + | Another sequence leads to Lobo, one of the wolves in Blanca's Wolf Bout. Aside from the mixed-up map, there is really no great difficulty in the dungeon. |
||
| − | '''Enemies''' |
||
| + | The player should keep an eye out for certain items. Two weapons not sold in stores are found here, along with the first [[Flare Brooch]]. Beyond a parted river of lava resides the boss battle. |
||
| + | ==Enemies Encountered== |
||
| − | *[[Samurai Ghoul]] |
||
| + | {|width="70%" style="border:solid 2px black; -moz-border-radius:10px; float:centre;" |
||
| − | *[[Bloomin Phoenix]] |
||
| + | |colspan="4" style="text-align:center; color:white; background:black; -moz-border-radius-topleft: 1em; -moz-border-radius-topright: 1em;"|<big>'''Enemies Encountered'''<big> </big></big> |
||
| − | *[[Lava Lump]] |
||
| + | |- |
||
| − | *[[Scorplilus|Scorpilus]] |
||
| + | |style="border:solid 2px black; style="text-align:center; color:white; background:black"|'''Name''' |
||
| − | *Lobo (Wolf Bout) |
||
| + | |style="border:solid 2px black; style="text-align:center; color:white; background:black"|'''Notes''' |
||
| − | *[[Neo-Astaroth|Neo Astaroth ]](boss) |
||
| + | |- |
||
| + | |style="border:solid 6px black; style="text-align:center; color:white; background:black"|'''[[Samurai Ghoul]]''' |
||
| + | |style="color:black; style="text-align:center; background:white"|- |
||
| + | |- |
||
| + | |style="border:solid 6px black; style="text-align:center; color:white; background:black"|'''[[Bloomin Phoenix]]''' |
||
| + | |style="color:black; style="text-align:center; background:white"|- |
||
| + | |- |
||
| + | |style="border:solid 6px black; style="text-align:center; color:white; background:black"|'''[[Lava Lump]]''' |
||
| + | |style="color:black; style="text-align:center; background:white"|- |
||
| + | |- |
||
| + | |style="border:solid 6px black; style="text-align:center; color:white; background:black"|'''[[Scorpilus]]''' |
||
| + | |style="color:black; style="text-align:center; background:white"|- |
||
| + | |} |
||
| + | {|width="70%" style="border:solid 2px black; -moz-border-radius:10px; float:centre;" |
||
| ⚫ | |||
| + | |colspan="4" style="text-align:center; color:white; background:black; -moz-border-radius-topleft: 1em; -moz-border-radius-topright: 1em;"|<big>'''Bosses'''<big> </big></big> |
||
| + | |- |
||
| + | |style="border:solid 2px black; style="text-align:center; color:white; background:black"|'''Name''' |
||
| + | |style="border:solid 2px black; style="text-align:center; color:white; background:black"|'''Notes''' |
||
| + | |- |
||
| + | |style="border:solid 6px black; style="text-align:center; color:white; background:black"|'''[[Neo-Astaroth]]''' |
||
| + | |style="color:black; style="text-align:center; background:white"|- |
||
| + | |} |
||
| + | {|width="70%" style="border:solid 2px black; -moz-border-radius:10px; float:centre;" |
||
| − | *Red Crystal |
||
| + | |colspan="4" style="text-align:center; color:white; background:black; -moz-border-radius-topleft: 1em; -moz-border-radius-topright: 1em;"|<big>'''Wolf Bout'''<big> </big></big> |
||
| − | *Blue Crystal |
||
| + | |- |
||
| − | *Yellow Crystal |
||
| + | |style="border:solid 2px black; style="text-align:center; color:white; background:black"|'''Name''' |
||
| ⚫ | |||
| + | |style="border:solid 2px black; style="text-align:center; color:white; background:black"|'''Notes''' |
||
| − | *[[Orias Crest]] |
||
| + | |- |
||
| − | *[[Lucia's Fans|Hades Fan]] (weapon for Lucia) |
||
| + | |style="border:solid 6px black; style="text-align:center; color:white; background:black"|'''[[Lobo (Wolf)|Lobo]]''' |
||
| ⚫ | |||
| + | |style="color:black; style="text-align:center; background:white"|- |
||
| − | *[[Flare Brooch]] |
||
| + | |} |
||
| ⚫ | |||
| + | |||
| ⚫ | |||
| ⚫ | |||
| ⚫ | |||
| + | ===Ground=== |
||
| − | *[[Attack Boost]] |
||
| + | *[[File:Sh2itemlogo.png]] [[Pure Extract]] |
||
| + | *[[File:Luciafan.png]] [[Lucia's Fans|Hades Fan]] |
||
| + | *[[File:Sh2accessorieslogo.png]] [[Huge Jug]] |
||
| ⚫ | |||
| + | *[[File:Sh2accessorieslogo.png]] [[Flare Brooch]] |
||
| + | ===Treasure Chests=== |
||
| + | *[[File:Sh2keyitemlogo.png]] [[Red Crystal]] |
||
| + | *[[File:Sh2keyitemlogo.png]] [[Blue Crystal]] |
||
| + | *[[File:Sh2keyitemlogo.png]] [[Yellow Crystal]] |
||
| ⚫ | |||
| + | *[[File:Magiccrestlogo.png]] [[Orias Crest]] |
||
| ⚫ | |||
| ⚫ | |||
| ⚫ | |||
| + | ===NPC Interaction=== |
||
| + | *[[File:Sh2ringitemlogo.png]] [[Attack Boost]] - Given by the [[Ring Soul]]. |
||
| + | ===Enemy Drops=== |
||
| + | *[[File:Sh2ringitemlogo.png]] [[Instant Death|Instant Death 3]] - Dropped by Lobo. |
||
| + | *[[File:Sh2ringitemlogo.png]] [[Delay|Delay 3]] - Dropped by Neo-Astaroth. |
||
| + | *[[File:Magiccrestlogo.png]] [[Astaroth Crest]] - Dropped by Neo-Astaroth. |
||
==Map== |
==Map== |
||
Revision as of 16:41, 30 July 2020
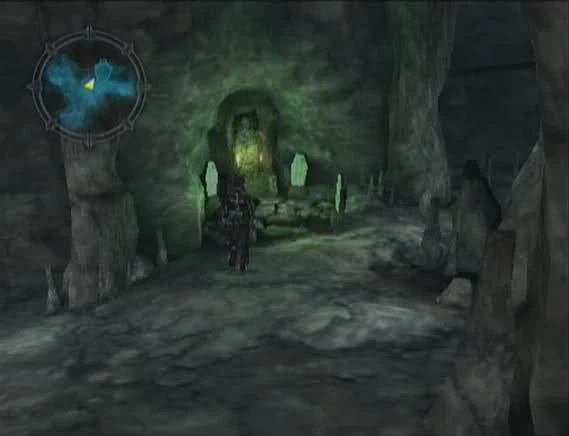
Immortal Mountain, or Mount Fuji, is the dungeon following the first visit to Inugami Village
It is one of the most complex dungeons in Shadow Hearts: Covenant. The reason for it is its bizarre setup. The player recieves three crystals. When placed on an altar, each different crystal can activate a teleport system that takes the player to different areas. Using these in different sequences allows the best access.
The treasure is the main reason for all this exploration, as some Crests can be found here. One path sequence leads directly to the Ring Soul, who gives Yuri and Karin an Attack Boost.
Another sequence leads to Lobo, one of the wolves in Blanca's Wolf Bout. Aside from the mixed-up map, there is really no great difficulty in the dungeon.
The player should keep an eye out for certain items. Two weapons not sold in stores are found here, along with the first Flare Brooch. Beyond a parted river of lava resides the boss battle.
Enemies Encountered
| Enemies Encountered | |||
| Name | Notes | ||
| Samurai Ghoul | - | ||
| Bloomin Phoenix | - | ||
| Lava Lump | - | ||
| Scorpilus | - | ||
| Bosses | |||
| Name | Notes | ||
| Neo-Astaroth | - | ||
| Wolf Bout | |||
| Name | Notes | ||
| Lobo | - | ||
Items
Ground
Treasure Chests
 Red Crystal
- Blue Crystal
- Yellow Crystal
- Samigina Crest
- Orias Crest
- Kogara-Maru
- Thera Extract
- Mana Extract
NPC Interaction
- Attack Boost - Given by the Ring Soul.
Enemy Drops
- Instant Death 3 - Dropped by Lobo.
- Delay 3 - Dropped by Neo-Astaroth.
- Astaroth Crest - Dropped by Neo-Astaroth.
Map
")
")
Gallery
")
")